Just a couple of quick projects I threw together when I was bored at home this past weekend. One of those stare-at-your-messy-crafting-space-until-ideas-pop-out-at-you kind of things.
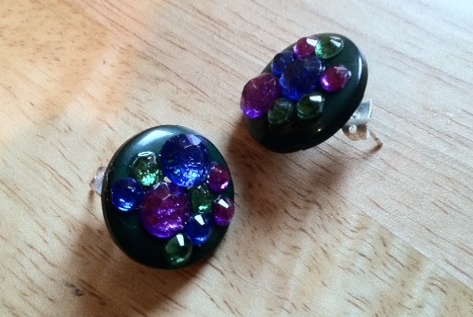
Retro Glam Earrings
They remind me of the boxes and boxes of glitsy costume jewelry my great grandmother had.
Retro Glam Earrings
They remind me of the boxes and boxes of glitsy costume jewelry my great grandmother had.
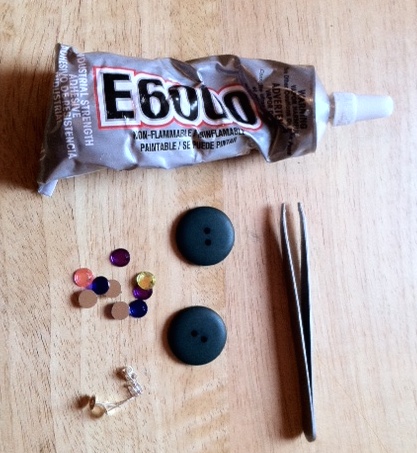
Materials
- silver earring posts and backs
- two large buttons
- misc. rhinestones
- strong crafting glue
- tweezers
Step 2: Squeeze a small amount of glue onto a piece of paper or cardboard. Using the tweezers, pick up each jewel and dip it lightly into the glue so that the back is coated and place onto the button. Place all of your jewels, then allow to dry.
Step 3: Once the glue has dried on the front, turn the buttons upside down on a flat surface. Dip the flat part of the earring posts into the glue, being sure to let it ooze over the top edge just a little, and affix to the buttons near the top edge.
Step 4: Allow to dry. Wear, and try to look as fabulous as my Nanny.
DIY Nail Decals
I cannot take credit for this method, there are a ton of other tutorials on this, but I can tell you that it is pretty easy and probably my new favorite nail-art method! You know, for when you want to get fancy. The best aspect, for me, is that it's a two-parter: one is a little mini-painting project and the other is doing your nails(which can be tedious if you're doing something elaborate) quickly and easily.
Materials:
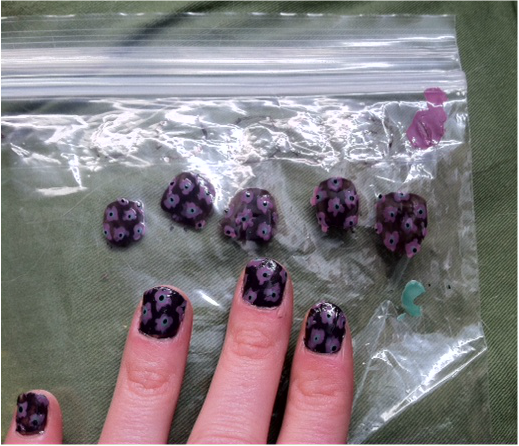
Step 2: Close the baggy and flip it over so that the side you didn't draw on is up. (This keeps any sharpie from getting onto your decals) Take your base nail polish color and fill each of your tracings with a good, thick layer.
Step 3: Using the toothpicks, or whatever you wish, draw/paint your designs on top of the base layer you just put down. Once you're done, allow them to dry for at least 4 hours. For best results, let them dry overnight.
Step 4: When you are ready to apply the decals, use the end of a toothpick or the edge of your fingernail to CAREFULLY peel each decal off of the plastic. Lay them out carefully so that they'll be easy to grab when you're ready to apply.
Step 5: Paint your first nail with a layer of the same base coat you used on the decals. Blow on it slightly or allow to dry for 20 seconds, or until tacky but not wet.
Step 6: Pick up the matching decal with the tip of the forefinger of your other hand and place carefully on the nail, design side up, with the top edge flush with your cuticle(this is why you traced your nail in the beginning) by gently tapping it into place. Those first few seconds are critical if you need to adjust the placement, move it or lose it!
Step 7: Smooth the rest of the decal onto your nail by rocking the finger you used to place the decal around on the nail. Check for bubbles and smooth these out with either another fingernail or the side of a toothpick. Trim the edges with a nail file or scissors.
Step 8: Finish placing the rest of the decals, then let dry completely. Coat with a generous layer of clear polish and be sure to seal the edge. LET DRY COMPLETELY.
Step 9: Find elaborate reasons to wave your hands around while you're talking so people will notice your fine handiwork!
- assorted nail polish colors
- nail art tools(or toothpicks if you're lazy like me)
- a plastic baggy
- a sharpie
- nail file or cuticle scissors
Step 2: Close the baggy and flip it over so that the side you didn't draw on is up. (This keeps any sharpie from getting onto your decals) Take your base nail polish color and fill each of your tracings with a good, thick layer.
Step 3: Using the toothpicks, or whatever you wish, draw/paint your designs on top of the base layer you just put down. Once you're done, allow them to dry for at least 4 hours. For best results, let them dry overnight.
Step 4: When you are ready to apply the decals, use the end of a toothpick or the edge of your fingernail to CAREFULLY peel each decal off of the plastic. Lay them out carefully so that they'll be easy to grab when you're ready to apply.
Step 5: Paint your first nail with a layer of the same base coat you used on the decals. Blow on it slightly or allow to dry for 20 seconds, or until tacky but not wet.
Step 6: Pick up the matching decal with the tip of the forefinger of your other hand and place carefully on the nail, design side up, with the top edge flush with your cuticle(this is why you traced your nail in the beginning) by gently tapping it into place. Those first few seconds are critical if you need to adjust the placement, move it or lose it!
Step 7: Smooth the rest of the decal onto your nail by rocking the finger you used to place the decal around on the nail. Check for bubbles and smooth these out with either another fingernail or the side of a toothpick. Trim the edges with a nail file or scissors.
Step 8: Finish placing the rest of the decals, then let dry completely. Coat with a generous layer of clear polish and be sure to seal the edge. LET DRY COMPLETELY.
Step 9: Find elaborate reasons to wave your hands around while you're talking so people will notice your fine handiwork!
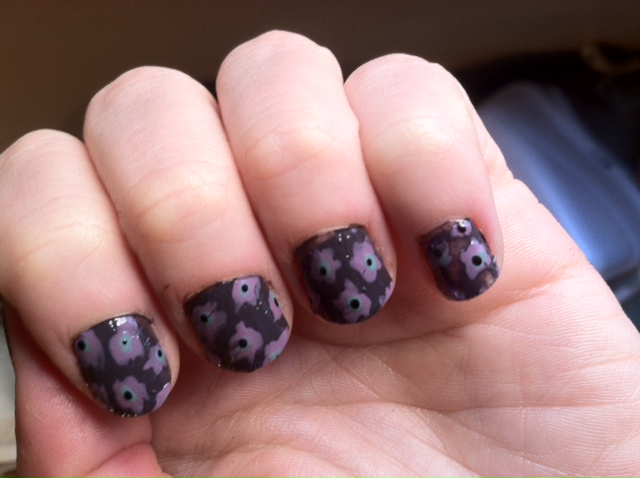
These were supposed to be some sort of urban floral pattern, but they kinda just look like amoebas.

 RSS Feed