She's craftyyyy!
  • Blog
  • About
  • Contact
  • Disclosure Policy

TShirt Upcycle - PRIDE Dress

6/26/2015

0 Comments

 
I made this dress for Boston Pride two weekends ago, and in honor of the historic ruling today, here is the tutorial for how I made it:
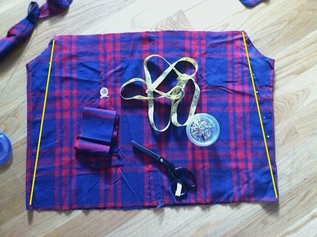
Materials:
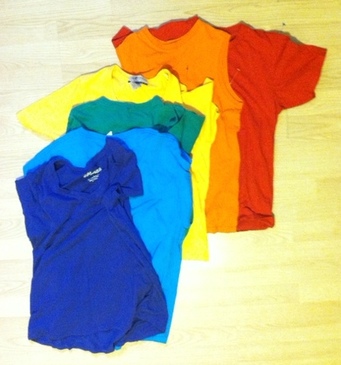
- 6 tshirts, one of each color of the basic rainbow, at least as big around as your hip measurement. Make sure the red shirt( if you want red to be the top) fits well across the chest.
- thread of a color you don't mind seeing on each (I used black)
- sewing equipment(machine, pins, measuring tape, etc.)
Picture
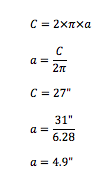
Step 1: Measure how long you want your dress to be from the top of your shoulder. Subtract one inch(because we'll use the existing hem on the top and the bottom pieces), divide this number by 6, and add one inch for seam allowance. The resulting number is how wide you should cut each strip.
Let's say I wanted my dress to be 37" long from shoulder to hem.
37" - 1" = 36"
36"/6=6"
6"+1"=7" So I need to cut a 7" strip from each shirt.
Step 2:
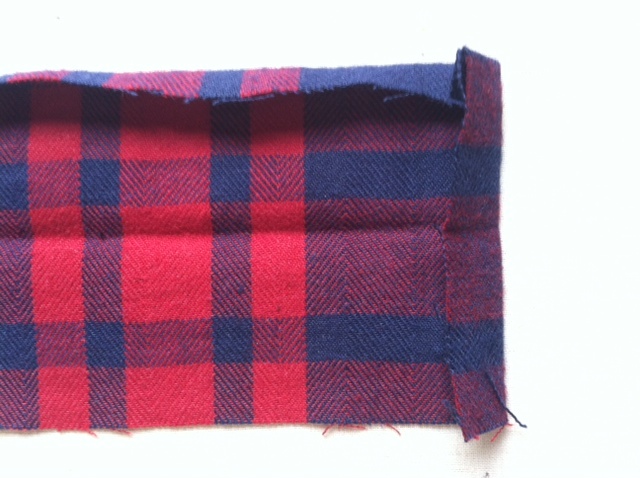
Take the red shirt(if you want red to be the top of your rainbow), measure 7" down from the side of the collar, and cut a straight line across at that point. Take the purple shirt(if you want purple to be the bottom)measure 7" up from the bottom hem, and cut a straight line across at that point. Take the rest of the shirts and cut a 7" wide strip from the middle, so that it does not include any hems.
Picture
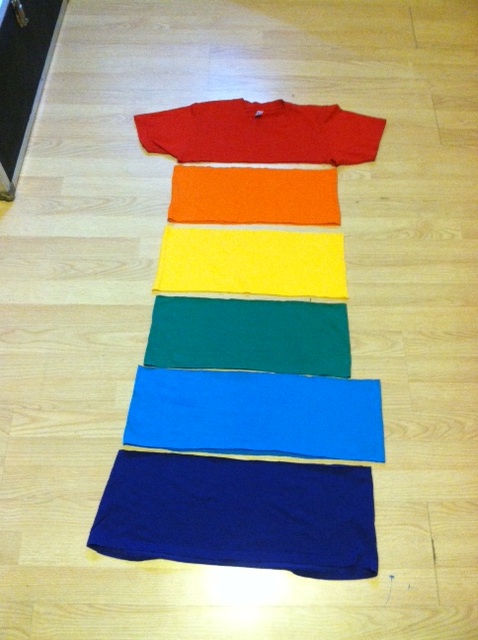
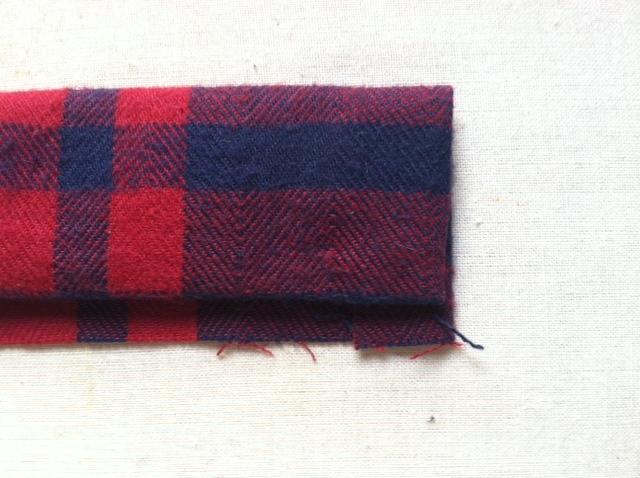
Notice my shirts weren't all the same width. We'll fix that later.
Step 3:
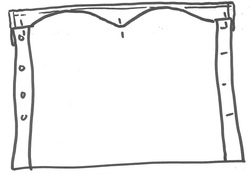
Measure the width of your top piece(which you should have fitted ahead of time). Make sure this width will fit over your hips and sew a seam down the side of each other strip so that they all measure the same width.
Step 4:
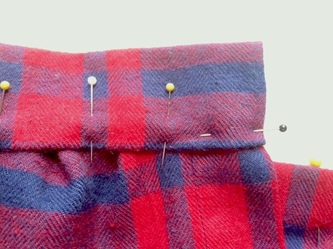
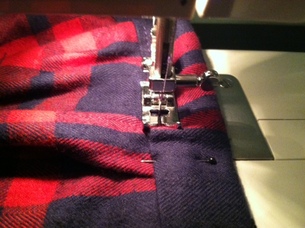
Sew the strips to each other using a zig-zag stitch, so that the seams have some give to them.
Step 5:
Try on your dress and pin down the sides to fit your torso more flatteringly. Remove and sew a straight stitch up the sides to these new measurements.
Step 6: Wear and be fabulous! Preferably with excessive amounts of glitter...
Picture
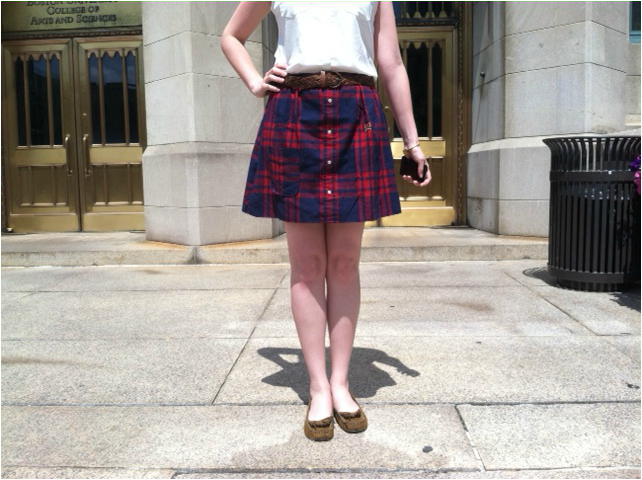
Excuse these awful pictures...
Picture
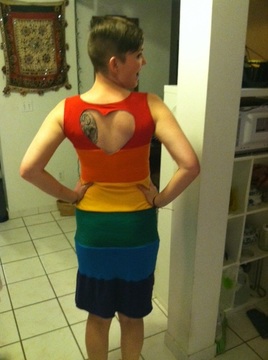
...I was so excited about Pride, I forgot to take better ones the day I wore it...
Notes:
I decided last-minute that I didn't want sleeves, so I cut the top to match my favorite tank top and zig-zag stitched around the edges.
To make the heart cut-out: Make/print a heart shape on a piece of paper, exactly the size you wish to cut out from the back of your dress. Take spare scrap of jersey fabric from one of the shirts that's at least as big as your heart pattern and pin it flat to the inside of the back of the dress. Pin the heart pattern in the center of the back, where you'd like it to sit, and sew a straight stitch all the way around the shape, using the edge as your guide. Using sharp(and preferably small) scissors, trim out both layers of fabric about 1/8" away from the inside of the heart shape you just sewed. On the inside, trip the spare fabric to about 1/8" around the outside of the heart shape you just sewed. This will help it lay flat, especially at the point.
Picture
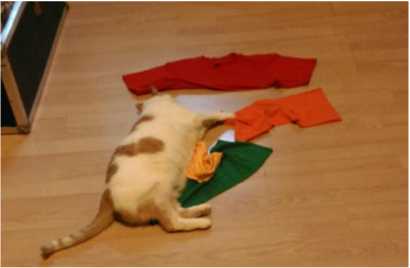
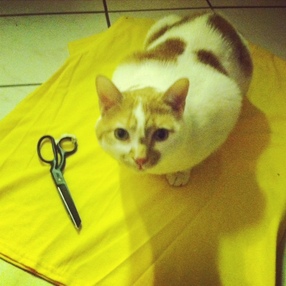
As usual, Cake wanted to help.
0 Comments

DIY Coffee Sugar Scrub

3/5/2015

0 Comments

 
The crafting spheres these days are awash with DIY beauty salves, soaks, and scrubs. It's kinda neat to see this increasing interest in making your own products and all the luxurious variations people are coming up with.
Now, to put in my two cents, here's the recipe to what I call my Green Coffee Scrub!
(Misleading since there isn't any "green" coffee in it, but there is tea tree oil and olive oil and tea is green and so is the olive oil, so there!)

This scrub is my magical talisman against razor burn and ingrown hairs, which I found after much trial and error in an attempt to appease my unhappy legs last summer. I use it in the shower to exfoliate before shaving and on the next day or two after shaving. Before, it removes dead skin cells to give a closer shave, softens the hairs, and leaves a protective layer of oil on the skin to prevent razorburn. After, it prevents ingrown hairs by removing dead skin cells, killing bacteria with its tea tree antimicrobial powers, and of course moisturizes INTENSELY with the olive oil. Olive oil is one of those all-round great beauty secrets. It is antiinflammatory, it doesn't clog pores, and it actually enhances exfoliation. Tea tree essential oil is a great antiseptic, anti-fungal, and skin soothing agent.
PLUS the caffeine in the coffee and the scrubbing motion of using this stuff is supposed to fight the appearance of cellulite. No joke! I am usually pretty skeptical of things that claim to vanish cellulite, because (insert global beauty industry here), but I have actually noticed my skin becoming smoother. Go figure.
Picture
Picture
Ingredients
- 2 cups of sugar
- 2 tablespoons of ground coffee - since this scrub is going to sit around for a while in a jar, please don't use damp, used coffee grounds, as they can grow nasty bacteria after a short amount of time
- 1/2 cup of olive oil or as much as needed to give your scrub a damp-sand kind of clingy/crumbly texture
- 6 drops of tea tree essential oil
- jar with a tight fitting lid

Directions:

1. Combine all ingredients with a large spoon or your hands in a large bowl.
2. Using a smaller spoon, pack the scrub tightly into your jar.
3. Use in the shower, but make sure to keep any water out of it.
Recommended amount: about a tablespoon per leg


Tips:
- Because you're scrubbing this stuff onto your skin, you will be absorbing some of the caffeine from the coffee. If you're sensitive to caffeine, it might not be a good idea to use this right before bed, but otherwise, I find it to be a nice pick-me-up in the morning.
- Definitely use this stuff in the shower and rinse your shower down afterwards. The sugar will dissolve while you use it and run down the drain pretty easily when you rinse off, but, not gonna lie, the coffee can make a mess.
- I don't recommend wearing white pants immediately after using this. The olive oil sitting on your skin will be infused with coffee and could stain any light-colored clothes.


0 Comments

DIY Maxi Flannel Skirt

3/2/2015

1 Comment

 
Picture
Photo Credit: Fred George III
Picture1950s Pendleton ad


Originally found this idea over at Pretty Quirky Pants. She has a great, detailed tutorial, so jump on over there if you're interested. In writing this post I realize that it must seem like I'm obsessed with button-down flannel skirts. I am not, particularly, but I was captured by the idea of the classic maxi tartan skirt. It's a beautiful and classic fashion staple with just enough of a vintage vibe to tickle my fancy.

Materials:
- 3 yards heavy flannel
- matching thread
- 10 small and one large matching buttons
- fabric scissors
- sewing machine
- measuring tape
- iron

Picture
Step 1: Fold your fabric in half length-wise. From one of the folded corners, measure along the fold to mark your waist radius(a) and skirt length(b). To calculate your waist radius, first measure around your waist where you want the skirt to sit, then add four inches. This measurement is your circumference, C. In my case, C = 27 inches + 4 inches = 31 inches.
As we all know from grade school math, the circumference of a circle is equal to twice the radius(a) times Pi. Do a little rearranging using algebra and you have an equation to calculate the radius from the circumference. (Don't worry, I've already done that, just use the second equation right there.)


Picture
Your skirt length, b, should equal however long you wish the skirt to fall from your waist. In my case, I just used as much length as I could get from the width of the fabric. Using pins or a light chalk pencil, mark two circles by measuring the skirt length and waist radius from the corner. Cut along both lines. From your remaining fabric, cut a rectangle about 3 inches wide and (waist circumference plus 2 inches) long. This is your waistband. As an example, my waist band piece was 3" wide by 29" long.

Step 2: Hem the bottom edge of the skirt by folding it in 1/4 ", pressing with an iron, folding again 1/4", and stitching down. Create the button placket along the straight edges of the skirt by folding them in 1/2", pressing, and folding again in 1", then stitching 1/8" in along the first folded edge.

Step 3: Press the shortest edges in by 1/2", then press your waistband piece in half with the nice side out, then open and press the long edges 1/2" in towards the fold. Pin the waistband to the top edge of the skirt so that it covers the top 1/2" of the skirt, extends one inch past the top(as buttoned) edge of the skirt, and is flush with the bottom(as buttoned) edge of the skirt. (see the following diagram for visual)
Sew 1/8" in all along the bottom and ends of the waistband.
Tip: Pin the ends first, then pin the middle of the waistband to the middle of the skirt, then kind of streeetch the curve of the skirt while you pin the rest. Otherwise, the curve of the waist can be tricksy to pin and pretends to be smaller than your waistband.
Picture
Step 4: Mark 10 places for your small buttons and button holes along the center of the button plackets of your skirt and finish the button holes on your sewing machine. Remember: the button holes go on the "top" side, the one to which we sewed with the inch of waistband extending beyond the edge, and the buttons go on the "bottom" side, just like the diagram above. Double check to make sure they match up, then sew on the buttons where you marked. Sew the large button hole in the center of the waistband overhang(so it's offset to the right about an inch from the line of buttons on the main part of the skirt) and mark and sew the large button on the other side.

The skirt, once you've finished, should look like this when laid out flat:
Picture
Step 5: Wear in coziness and enjoy! I've paired this skirt with leggings and a cardigan for work, knee-highs and a crop top for the goth club. Love it!

1 Comment

DIY Coiled Rope Basket

12/15/2014

1 Comment

 
Picture
For some reason, I just love covering my vanity with little dishes and baskets and bowls to hold rings and earrings and all the miscellaneous stuff that shows up there. It makes the chaos seems a little more manageable, perhaps, all cutely divided up.
Anyways, here's an easy project to make a coiled rope basket, perfect for a little holiday gift. You can make it as big or as tiny as you like, it just depends on how long you keep a-coilin'.

Materials:
Cotton rope (of any thickness, but I used 1/4")
Embroidery thread
Embroidery needle

Picture
Picture


Step 1:

Tie the end of a long length of thread to the starting end of your rope. Make sure to tie the knot tightly!
Step 2:
Bend the last half-inch or so of the rope back over onto itself and wrap it tightly with 3 or 4 loops of the thread.
Double over
Wrap tightly!


Step 3:

Bend the wrapped end of the rope again back on itself again, so that now you have the start of a coil.
Picture
Picture
Picture
Picture
Picture


Step 4:

Flip the coil so that the loose end is now facing away from you and the thread is hanging down from the center. Wrap the thread out and away from you, up, and stitch down through the center of the coil using the needle. (Follow my words, not necessarily my picture; I realized I photographed this confusingly)

Do this again and again until you have fixed another coil of the rope around our initial one.


The basic principle of this basket weaving technique is to wrap the outside coil of rope to the previous coil, going around and around in a spiral. You need the needle to fit the thread between the previous coil and IT'S previous coil, NOT to sew the rope coils together by piercing the actual rope.


Keep going around and around until you've reached the desired size of your base...
If you finish a length of thread, tie it off and tie the next piece of thread to the same knot. Tuck the ends between the coils as you keep going, wrapping them into the weave of the basket.
Picture
Then start curving the shape of the basket up by coiling the rope a little higher with each revolution, until you reach...

...however high you wish it to be! Try playing with the colors of thread, for a fun twist (get it?)!!!
When you've reached the desired size of your basket, cut off the length of rope. Stitch several times around the end and the coil below just as you have been, stitching tightly and very closely together until you have sort of "capped" the end of the rope. Tie off the thread and use the needle to stitch it back through several loops to keep it from coming loose.
Picture
Taa Daa!
There you have it, my lovelies! Weave away!
1 Comment

DIY Soapmaking (Melt-and-pour) Vanilla Chai Shea Butter Soap

11/17/2014

1 Comment

 
Picture
Hi lovelies! While cruising my favorite crafting blogs recently (see my post here) I developed an interest in soap making. What with all the DIY cosmetics and such I've been making, soap-making just seems like the next fun step! Now, while I want to eventually be mixing my own blend of oils and lye and such to make bar and liquid soaps, I decided to do an easy version first: the melt and pour.
This project could not be any easier. You can buy the base soap in any craft store, or online, an a wide variety, such as olive oil, glycerine, shea butter, suspension and non, etc.! I used ArtMinds Shea Butter soap, suspension formula. What "suspension formula" means is that whatever I add into my soup will be "suspended" throughout the finished bar. With some formulas, coarse ingredients can sink to the bottom of the mold during cooling, which could be a desired effect or not.
Picture
As you can see in the photo above, it comes in a plastic container in a big block. The soap is a firm solid, but I found it easy enough to cut into chunks with a sharp kitchen knife.
DIY Vanilla Chai Shea Butter Soap
Materials:
  • melt-and-pour shea butter soap base - 2lb
  • 6 bags of chai tea
  • vanilla extract
  • Vitamin E oil (added as a preservative and as an extra treat for the skin)
  • microwave-safe glass bowl
  • soap mold
  • wire cooling rack
Picture
Step 1:
Cut the soap into chunks and place in your microwave-safe bowl. Melt in microwave (or follow the stovetop directions) according to the directions on the packaging. Due to the size of my bowl, I was only able to melt half of the block at a time.
Picture
Step 2:
Tear open the tea bags (3 per lb of soap) and pour contents into the melted soap. Add a dash of vanilla and mix thoroughly.
Picture
Step 3:
I tempted fate here and stuck the mixture back in the microwave again for 30 seconds to try to let the heat infuse some of the chai scent into the soap. Worth the risk.
Picture
Step 4:
Once your melted soap is thoroughly mixed and infused and such, pour into soap mold and stick the whole mold into the freezer for 30 minutes. Usually, you would just leave the mold out to cool on it's own, but as I only had the one 4-bar mold, I got impatient.
Picture
Step 5:
Once cool, pop the bars out of the mold(putting them in the freezer helps here) and set them flat on the cooling rack. Allow the bars to rest on the cooling rack for 24 hours. This allows them to "cure". Most things you read online will tell you that melt and pour soap doesn't need to cure, but I found that the quality of my soap; lather, scent, texture; improved after letting it sit out overnight. If you notice a lot of moisture or oil on the surface of the bars when you first pop them out, don't stress, they will be absorbed back into the bar while curing.
Picture
1 Comment

DIY Cat Accoutrements

9/24/2014

0 Comments

 
Picture
Crochet Mouse Toy - Using the pattern from here, I crocheted this little thing while watching a couple of episodes of Trailer Park Boys (my current fave). This was my first project for our cat and I completed it in a fit of craftiness that struck when we weren't even unpacked yet! All my supplies and tools were still in boxes (except a crochet hook that had been living in my purse), so this was a very spur-of-the-moment project. To stuff it, I recycled some plastic grocery bags by drawing them into a rope with my hands and snipping thin strips off with scissors into a kind of Easter-grass-ish fluff. I also stuck a little jingle-bell(that I found while packing) in there for noise. I did not, at the time, have any catnip to put in, which is just as well .


Picture
Cardboard Scratch Pad - After a run to IKEA, our new house was full of funkily-named furniture and cardboard boxes. Knowing how kitties need to scratch, I looked up DIY cardboard cat scratchers and got some ideas to make one and reuse some of that cardboard. Instructions below:

P.S. Did you know they charge around $15 for this in a pet store? $15 for some cut up cardboard. No, thank you!
Picture
Materials: cardboard, scissors, school glue, super glue
Step 1: Cut the cardboard into a bunch of strips, 1.5-2" wide, cutting it so that the long edge shows the wavy inside layer like this   ------------------------------------------------------------>
You can see in the pictures that I didn't catch on to this until I had already rolled a few strips.

Step 2: Take the first strip and start rolling it up tightly. After you've rolled it a few times, start putting a long strip of glue in the middle of the inside of the strip, doing sections as you roll it up. When you reach the end, put a tiny bit of superglue on the end and hold it down for a few seconds until it bonds. I did this just so that the superglue would hold each strip in place securely while the regular glue dried.
Picture
Picture
Picture

Step 3:
Put a little bit of super glue next to the end of the last cardboard strip, take a new strip, and press the end firmly into the glue until it bonds. Then continue with the rolling and the regular glue. Keeping rolling and gluing until the circle reaches about a foot in diameter, or until it seems big enough for your cat to lounge on.

Picture
Tips:
-To make the cardboard roll more smoothly, run the entire strip through a curve in your hands to pre-bend it. This avoids any big gaps due to the cardboard creasing in a weird place and refusing to lie flat.
-To get your cat interested, sprinkle some catnip onto the pad. It should fall into the holes and small gaps in the cardboard and make the whole thing smell heavenly (to your cat). Did this and within the first 5 minutes of being in our house, Cake walked right over to it unprompted and began kneading it with her claws. Smart kitty.
Picture
Crochet Cat Yurt - I originally pinned this on my Crafts to Craft pinboard while I was still just dreaming of the day when I would have a kitty to put in it. Now, I'm really excited to start working on it for realsies! This is another recycling craft, using old tshirts from Goodwill to make tshirt yarn. I followed this neat tutorial on how to easily make one continuous piece of yarn from most of the shirt, instead of tying a bunch of pieces together.
One note: crocheting with tshirt yarn takes a LOT more tshirts than you think. Probably 10 yellow shirts went into this project, and I used every scrap I could, including the sleeves and as much of the yoke as possible.

Picture
Helping.
Picture
Finished!
Picture
Initial testing.
Picture
Yes, yes, very nice. Now go away, human!
0 Comments

DIY Skirt from a Mens Flannel Shirt

7/29/2014

1 Comment

 
Picture
Photo credit: Emily Johnson
Picture
Refashion time! While trolling through my favorite crafting pinboards, I saw quite a few tutorials for making skirts from men's button-downs. All cute, but most kept the curved hem at the bottom of the shirt, and I was thinking more along the lines of this: ------------------------------------------------>


So, I went to Goodwill for a shirt and just did my own thing.
Here's the tutorial!

Materials: men's XL flannel shirt, matching thread, big button for the waist closure, iron

Step 1: With a seam ripper, remove the pocket/s. Save these to reattach later, or don't. Lay out the shirt as flat as you can and cut straight across the bottom, so that all of the curved hem is removed, and straight across the middle under the sleeves. You'll see in my photos that I cut a little higher on the top, cutting in around the arm holes. This is because I am a tall girl and I wanted this skirt to pass the fingertip rule(hem is below my fingertips while standing straight with my arms extended down, for those of you who didn't attend public high school in the early 2000s. :)) so I could wear it to work. Unfortunately, this took away some of the width of the skirt, so it wasn't as full and gathered at the top as I would have liked, but c'est la vie. If you don't mind a shorter skirt, cut straight across under the arms.
Picture

Step 2:
Measure the circumference of your waist and cut strips of flannel from the upper back or sleeves that are 3.5 inches wide and your-circumference-plus-the-width-of-your-button-placket-plus-1/2inch long. (Example: my waist circumference = 30inches, my button placket = 1.5 inches, so my waistband piece should be 30+1.5+0.5=32 inches long) You may have to cut two strips and sew them together in the middle to make one long enough. This will make your waistband.


Picture


Step 3
: If you cut high around the sleeves, turn the tube of the skirt inside out and pin two lines down each side from the top corners to the bottom corners of the same side. If you just cut straight across under the arms, you don't need to do this step.

Step 4: If you had to cut two pieces to make your waistband long enough, sew them together in the center. Lay the waist band out flat on an ironing board and press that middle seam open. Then fold the waistband over itself along the long edge, wrong sides together, and press. Open the waistband again and fold one long edge and both short edges in 1/2 inch and press. Fold the waist band back on the original middle fold and press everything well. The waistband piece should look like the bottom left image when opened and the bottom right image when pressed closed.
*Those of you who are expert seamstresses/ers might take issue with the fact that I didn't press in the other long edge of the waistband. I did this because A) I'm lazy and B) this way guarantees that, when I sew the waistband to the skirt, one seam will definitely catch both the back and front side of the waistband. It does make the inside of the seam look raw and unfinished, but I didn't feel the need for professional-grade detail on an easy refashion project.

** From here I'm going to deviate from what I actually did and tell you how I should have done it. Hindsight, as they say, is 20/20 and as I was writing this I saw a much simpler way of finishing this skirt.
Picture


Step 5
: To create the bottom hem of the skirt, unbutton the tube of the skirt and lay out right-side down. Fold up and press 1/4 inch of the bottom edge, pin, and sew with a straight seam.
To save length, I did not fold it twice.

Picture
Step 6: Lay out the skirt piece again, right side up. Open the waist band and place the top edge of the skirt inside so that the unpressed edge of the waistband is under the skirt, the top edge of the skirt is against the center crease of the waistband and the sides match the ends of the waistband. Pin the two sides of the skirt to the ends of the open waistband. Pin the center of the skirt piece to the center of the waistband. The skirt piece is obviously much longer than the waistband and we'll gather up the excess in the next step.

Step 6: Make 4 box pleats, evenly spaced, to gather up the excess skirt material so that it lies flat against the length of the waistband. This can be done simply by making the pleats with your fingers and pinning them down. Fold the waistband closed over the top edge of the now pleated skirt and pin closed along it's length.
Fold box pleats.
Fold waistband down over skirt and pin.
Picture


After pinning, the ends should look like this:

Picture


Step 7
: Sew a straight seam 1/8-1/4 inch from the bottom of the waistband.

Picture


Step 8:
Button up the skirt again, right-side out, and sew one seam up the left side of the button placket until about 4 inches from the top. The last four inches will allow the skirt to go over you hips when you put it on.

Step 9: Now that the structure of the skirt is done, the last step is to put in the button closure in the waistband. Lay your skirt out flat and mark where the button and button hole will go. Using your machine, stitch a button hole in the outside button placket and and cut it open. Attach your big button to the inside button placket.
Button holes are tricksy! A little crooked here, but hopefully the big button will hide it.
Step 10: For a touch of whimsy, or just a place to put your keys, reattach one or both of the pockets you removed earlier. Wear and enjoy!
Picture
Picture
1 Comment

DIY Face Care

7/22/2014

0 Comments

 
Picture
Picturemy washcloth
I distinctly remember when I was a kid just going into middle school, one of the most important "now you are becoming an adult" talks was about skin care. My mother has the most beautiful complexion, which is its own testament to her advice. Until recently, also on her advice, I used Clinique, which has the feeling of luxury skincare products with a (little) less devastating pricetag, and they have a bunch of options for sensitive skin types(such as my Arg!-Sun!-Freak-out-time!-prone epidermis).

Then, for who knows what reason, my skin decided to hate water. Fortunately, it was only one specific kind of water: Maine water, but after weeks of breaking out in hives every time I washed my face, I fell back on my travel/camping soap: Dr Bronner's 'Magic' Lavender Pure Castile liquid soap, just to try switching things up. A combination of using that soap and only cold, filtered water to wash my face turned out to be the solution to my strange problem, but since then I've continued to use my Dr Bronners and abandoned my fancy Clinique.

Fast forward three years and I'm back from Africa and trying to figure out my beauty care routine again now that I have access to things like running water and weather that doesn't make me sweaty constantly. Browsing crafting blogs and DIY forums introduced me to the world of DIY cosmetics and I decided to try making my own products with the vague goals of: 1) trying to wean myself off of mass-produced products (ain't no CVS after the apocalypse!); 2) learning WHAT I put on my face and WHY; and 3) entertaining myself with cute little jars and bottles of stuff I brewed up personally.

So, here is my current skin-care regime as I've figured it:
Step 1: Wash face and neck with tepid(cold shrinks pores, which you don't want until after they're all nice and clean, heat can aggravate my stupid @$%&*@ skin) water, handmade cotton washcloth, and Dr Bronner's Lavendar Castile liquid soap. The washcloth I crocheted following this tutorial here. I made two: one for washing(and exfoliating just a bit) and one for drying. A ton of acne-causing bacteria can live on your body and hand towels, even when you wash them weekly, so this step eliminates some of that.
Step 2: Swab face and neck using a cotton ball soaked in witch hazel. The witch hazel acts as an astringent: tightening pores, removing excess oils, and reducing inflammation. I use the cheapo CVS brand, which also contains a little alcohol. This can be drying to some skin types, but I feel like it gives my skin the good "astringenting" it needs. I realize that this part isn't exactly DIY, but next time I find myself in possession of some witch hazel bark I know just how to make some, thanks to this tutorial here.
Step 3: Moisturize thoroughly using my homemade facial moisturizer. I originally used this recipe here , but found it to be too oily for summer use. I stuck the batch in the back of the freezer to keep for the harsher, drying winter weather and went back to my drawing board(a.k.a. a stickynote pad). The result ended up being roughly like this:
DIY Moisturizer for Summer
Ingredients:
-
1c aloe vera gel
- 4 Tbs of sweet almond oil
- 1/2 Tbs melted beeswax
- 15 drops of Lavender EO (essential oil) - Lavender is antibacterial and anti-inflammatory
- 5 drops Carrot Seed EO - Carrot seed acts as an antioxidant and can have an SPF of 40+
- 3 drops Tea Tree EO - Tea tree is one of those über oils used in cosmetics and herbal medicine because of it's antibacterial and healing properties
Steps:
1. Melt the beeswax in the microwave(maybe 30 seconds) and whisk in the almond oil. Alow to cool to room temperature and 'mush' up again with a fork. This mushing helps prevent lumps in your final product and softens up the oil mixture so that it's easier to blend.
2. In a blender, whip the oil/wax mixture and the aloe vera gel together. it should produce a lovely pale lotion with a creamy texture.
3. Add the EOs. Mix well. Store in small, airtight container.
Step 4: Exfoliate once a week using about 1tsp of baking soda. Do this step between washing your face and moisturizing it. In your hand, mix the baking soda with enough water to make a thin paste. Massage into skin for a little while, leave on for about a minute, then rinse thoroughly. The baking soda crystals are fine enough that it exfoliates away the top layer of dead skin without irritating the living layer beneath it, leaving your skin(even mine!) fresh and glowing afterwards.

Next project: homemade deodorant!

0 Comments

Leather Monstera Leaf earrings

7/11/2014

0 Comments

 
Picture


Long time, no post, but I just finished a project that I'm really excited about! Originally inspired by this tutorial here, when I bought a new bag of leather remnants there was a perfect scrap of army green vegan leather and I knew what I needed to do. This project is as easy as cut, glue, wear...
Step 1: Sketch your shape(I just Googled 'monstera leaf' for reference) on the rough side of the leather and cut using sharp scissors or an Xacto knife(a crafter's BFF!). When you're sketching, make sure to be thinking about covering up the head of the earring post. Get too excited about the funky gaps in the leaf and you might end up with too little of a solid area at the top to cover it and it will show. NBD, just something to consider.
Step 2: Using a strong craft glue, such as E-6000, attach blank earring posts to the back. Make sure to let the glue dry completely!
Step 3: Wear with pride! The leaves are a bit big, so I usually wear them in my second piercing so that the edges don't push up against my face. I really like how they sort of take over my whole earlobe. Definitely a statement.
Step 1: Draw and cut!
Step 2: Glue!
Step 3: Wear!
0 Comments

Skull-mani

6/13/2014

0 Comments

 
Picture
Another funky nail art tutorial-ish. Did this one for the goth club. Oh how I love to goth-out once a month! If you like The Crow, if you enjoy Poe, if you have an inner crush on dressing dramatically, or like industrial music, if you ever thought about how you wished you could find a club scene like The Bronze from Buffy and hang out with people like Abby Sciuto from NCIS; find one and go:  http://www.xmortis.com/
Step 1: Paint nails with a black base coat.
Step 2: Paint on the skull shape in white. I painted on a wide stripe, the width of the upper jaw part, first, then went back and added two angled stripes to make the cheekbones and add a little roundness to the the top.
Step 3. Allow to dry completely, then draw on eyes, nose, and teeth with regular Sharpie.
Step 4: Finish with a clear topcoat to protect the sharpie, otherwise it can rub off of the dry polish.

Step 5: Enjoy a little spookiness at your fingertips!

0 Comments
<<Previous
    Picture

    Nora Jane

    This globetrotting craft-maniac  has settled down in Boston for a bit.

    Archives

    July 2014
    June 2014
    March 2014

    Categories

    All
    Cosmetics
    DIY
    Jacket
    Jewelry
    Nail Art
    Projects
    Sweater
    Tutorial

    RSS Feed


Powered by Create your own unique website with customizable templates.